
Getting Started with Plugins
In this tutorial we will use the Azure plugin to demonstrate how to configure and use plugins with Porter. This allows us to manage bundles as a team and resolve credentials from a secure secret store.
- Create a storage account
- Create a container for porter
- Save the storage account connection string
- Create a key vault
- Add a secret
- Create a service principal
- Configure permissions on key vault
- Configure Porter to use the plugin
- Try it out
Prerequisites
- A Microsoft Azure account
- Install Porter
Create a storage account
Porter needs a blob storage account to store files.
-
On the Azure portal menu, select All services. In the list of resources, type Storage Accounts.
-
On the Storage Accounts window that appears, choose Add.
-
Under the Account kind field, select either StorageV2 (general purpose v2) or BlobStorage.
-
Select Review + Create to review your storage account settings and create the account.
-
Select Create.
Create a container for Porter
Porter stores its data in a single blob storage container named “porter”.
-
Navigate to your new storage account in the Azure portal.
-
In the left menu for the storage account, scroll to the Blob service section, then select Containers.
-
Select the + Container button.
-
Type
porterfor the name of the new container. The name must be porter. -
Leave the access level for the container to Private (no anonymous access).
-
Click OK to create the container.
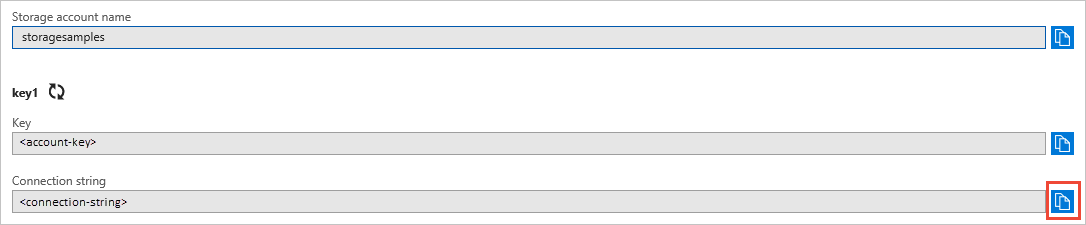
Save the storage account connection string
Next we will save the connection string for the storage account.
-
Navigate to your new storage account in the Azure portal.
-
In the Settings section of the storage account overview, select Access keys. Your account access keys appear, as well as the complete connection string for each key.
-
Find the Connection String value under key1, and click the Copy button to copy the account key.
-
Define an environment variable
AZURE_STORAGE_CONNECTION_STRINGand set its value with the connection string from the previous step.bash
export AZURE_STORAGE_CONNECTION_STRING="DefaultEndpointsProtocol=https;AccountName=***;AccountKey=***;EndpointSuffix=core.windows.net"powershell
$env:AZURE_STORAGE_CONNECTION_STRING="DefaultEndpointsProtocol=https;AccountName=***;AccountKey=***;EndpointSuffix=core.windows.net"
Create a key vault
-
From the Azure portal menu, select Create a resource. In the Search box, type Key Vault.
-
On the Key Vault section, choose Create.
-
For the tutorial we recommend using the same subscription, resource group and location that you used for the storage account.
-
Click Create.
Add a secret
The bundle used in this tutorial retrieves a secret named “password” stored in this key vault.
-
Navigate to your new key vault in the Azure portal.
-
In the left menu for the storage account, scroll to the Settings section and then select Secrets.
-
Select the + Generate/Import button.
-
Set the Name of the secret to
password. -
Set the Value of the secret to any value, for example
TopSecret!. The value itself is not important for this tutorial, only that a value is set. -
Leave the other fields with their default values.
-
Click Create.
Create a service principal
Now we will create a service principal and give it access to our key vault.
-
From the Azure portal menu, select Create a resource. In the Search box, type Azure Active Directory.
-
Next select App registrations, then + New registration.
-
Name your application porter-plugin-tutorial.
-
Leave the other fields with their default values.
-
Click Register.
-
On the app registration page, note the Application (client) ID and Directory (tenant) ID, and then define environment variables for them:
bash
export AZURE_CLIENT_ID="<APPLICATION_CLIENT_ID>"
export AZURE_TENANT_ID="<DIRECTORY_TENANT_ID>"
powershell
$env:AZURE_CLIENT_ID="<APPLICATION_CLIENT_ID>" $env:AZURE_TENANT_ID="<DIRECTORY_TENANT_ID>" -
In the left menu for the app registration, scroll to the Manage section and select Certificates & secrets.
-
Under Client secrets click + New client secret.
-
Leave the fields with their default values.
-
Click Add.
-
Copy the generated client secret and define an environment variable for it:
bash
export AZURE_CLIENT_SECRET="<CLIENT_SECRET>"powershell
$env:AZURE_CLIENT_SECRET="<CLIENT_SECRET>"
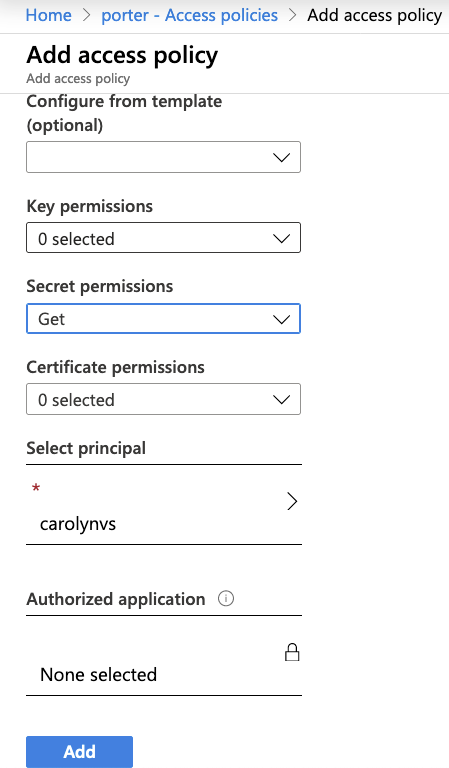
Configure permissions on key vault
-
Navigate to your new key vault in the Azure portal.
-
In the Settings section of the key vault overview, select Access policies.
-
Click + Add Access Policy.
-
In the Secret Permissions field select Get.
-
In the Select principal field, select the service principal created in the previous section.
-
Leave the other fields with their default values.
-
Click Add.
Configure Porter to use the plugin
Now that we have all the data the plugin would need to connect to our cloud resources, the last step is to update Porter’s configuration so it uses the plugin.
-
Open or create
~/.porter/config.toml. -
Add the following line to activate the Azure blob storage plugin:
default-storage-plugin = "azure.blob" -
Add the following lines to activate and configure the Azure keyvault secrets plugin. Replace
myvaultwith the name of the Key Vault that you created earlier.default-secrets = "mysecrets" [[secrets]] name = "mysecrets" plugin = "azure.keyvault" [secrets.config] vault = "myvault"
Try it out
Let’s try out Porter with the plugin activated and see it in action!
$ porter list
NAME           CREATED      MODIFIED     LAST ACTION   LAST STATUS
If you had previously installed bundles before, you won’t see them anymore because porter is using the plugin to list bundles from the storage account. So let’s install another bundle and have it saved to the cloud.
We will use the ghcr.io/getporter/examples/plugins-tutorial:v0.2.0 bundle, let’s use porter explain to see what credentials are necessary.
$ porter explain ghcr.io/getporter/examples/plugins-tutorial:v0.2.0
Name: plugins-tutorial
Description: Example of porter resolving credentials from a secrets store using a plugin.
This bundle is a companion for the plugin tutorial at https://getporter.org/plugins/tutorial/.
Version: 0.1.0

Credentials:
Name       Description                                                                         Required
password   Password for installing the world. We recommend getting this from a secret store.   true
Since the bundle needs a credential, let’s generate it using porter credentials command.
First, run porter credentials create <file-name> to generate the template file.
Then, edit the file to include required credentials and set the source for its value.
Lastly, run porter credentials apply <file-name> to generate the credential set.
$ porter credentials create plugins-tutorial.json
creating porter credential set in the current directory
$ cat plugins-tutorial.json
# modify plugins-tutorial.json with your editor to the content below
{
    "schemaType": "CredentialSet",
    "schemaVersion": "1.0.1",
    "name": "plugins-tutorial",
    "credentials": [
        {
            "name": "password",
            "source": {
                "secret": "password"
            }
        }
    ]
}
$ porter credentials apply plugins-tutorial.json
Applied /plugins-tutorial credential set
For more information on how to use porter credentials commands, take a look at our credentials quickstart guide.
Now we are ready to install the bundle and pass it our generated credentials. 🎉 Porter is using the Azure plugin to inject the password credential from Azure Key Vault into the bundle during install.
$ porter install --reference ghcr.io/getporter/examples/plugins-tutorial:v0.2.0 -c plugins-tutorial
installing plugins-tutorial...
executing install action from plugins-tutorial (installation: plugins-tutorial)
Install World
Using Magic Password: *******
execution completed successfully!
The installation is recorded in Azure Blob Storage and read back out again
by the Azure plugin when we run porter list.
$ porter list
NAME                CREATED          MODIFIED         LAST ACTION   LAST STATUS
plugins-tutorial    51 seconds ago   49 seconds ago   install       success
Now the installation of the plugins-tutorial bundle is saved in the cloud and shared with the rest of our team. A co-worker using the same configuration will see the same list of bundles that we do, and can perform further actions on the bundles. Go team! 🙌